There is much to say about photography, but many others have already said it. But for anyone who ever has to promote or advocate for something, knowing how to take, edit, and manipulate digital photos is a useful skill.
DIY photos
There are any number of resources for learning the basics of framing shots and using various types of cameras, including this great one from Lifehacker. There’s an adage that goes, “The best camera is the one you have with you when you need it.” That’s true now more than ever. But this isn’t where you’ll learn about aperture, shutter, exposure and speed.
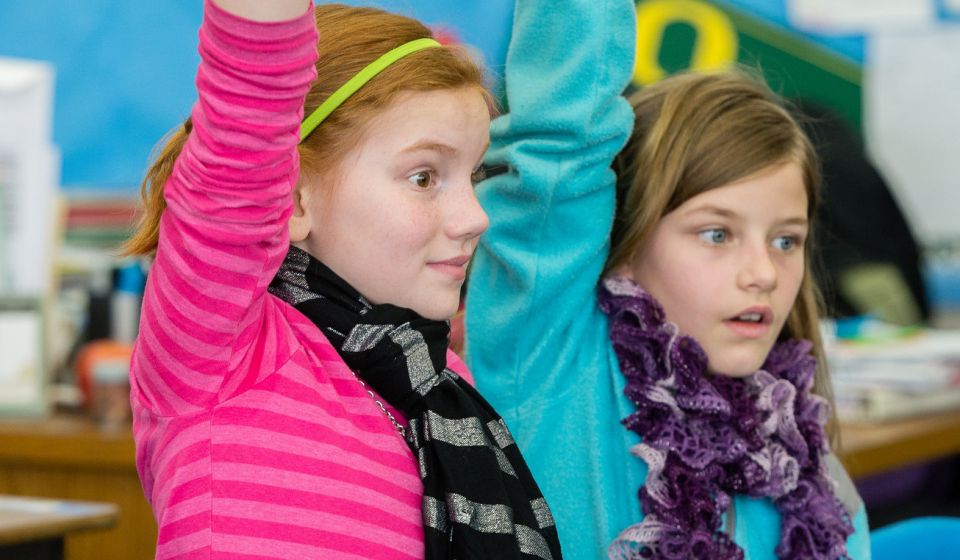
To a certain extent, many people are a little dubious of photos that have too much production value, like stock photos or staged, professionally done photos. In the social media era, photos aren’t keepsakes so much as little moments. Some resonate, some don’t. In the Instagram age, there’s a certain authenticity to an “amateur” photo that has value, particularly if it captures a real moment.
In the Instagram age, there’s a certain authenticity to an “amateur” photo that has value, particularly if it captures a real moment.
There are a million reasons why photos might be part of your work life. Maybe a big guest speaker is coming and you need do capture it “for posterity.” Or maybe you’re hosting an conference or seminar and you need photos from the current year to help promote the following year. Maybe you have access to a decent camera and know how to use it, or maybe you have the camera on your phone and that’s it. The truth is, a decent photographer can take a good picture with just about anything.
If you have access to such a person, like another staff member or a freelancer, and you prefer to tap them for photos, great. Keep doing that. But if you want to be able to do it yourself, go and learn the basics and practice a bit. You’ll get much better, much faster, and you’ll have more fun doing it.
If your camera doesn’t have any manual settings — just “modes” like portrait, landscape, night, sports, etc. — setting it to portrait mode gives you the largest aperture setting for creating soft backgrounds.
On a point-and-shoot camera, portrait mode opens the aperture as wide as it will go, helping shallow the depth of field and blur the background.
If you’re connected to a larger organization, someone in the marketing or communications office may have access to a repository of photos that you already are cleared to use. Or, they may have access to stock photos and can do you a favor.
It’s all about context
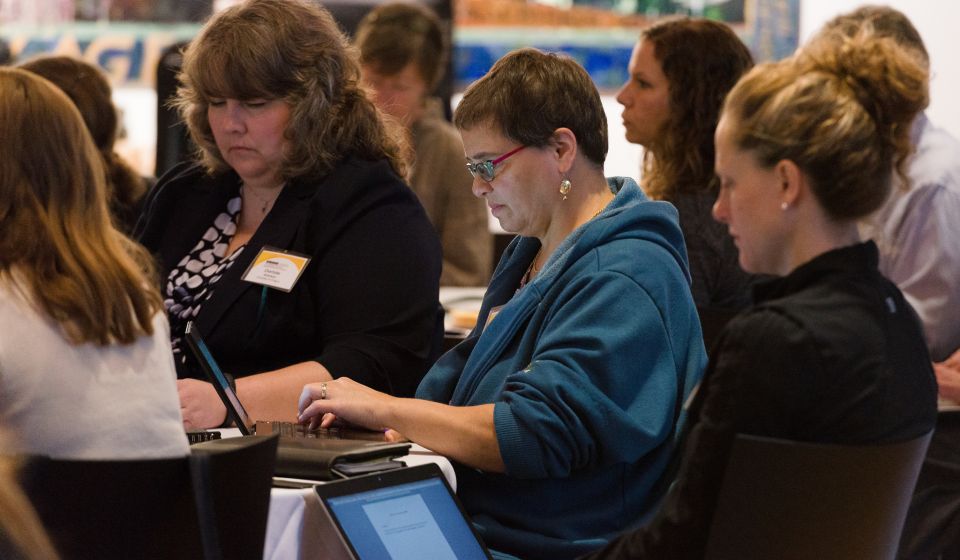
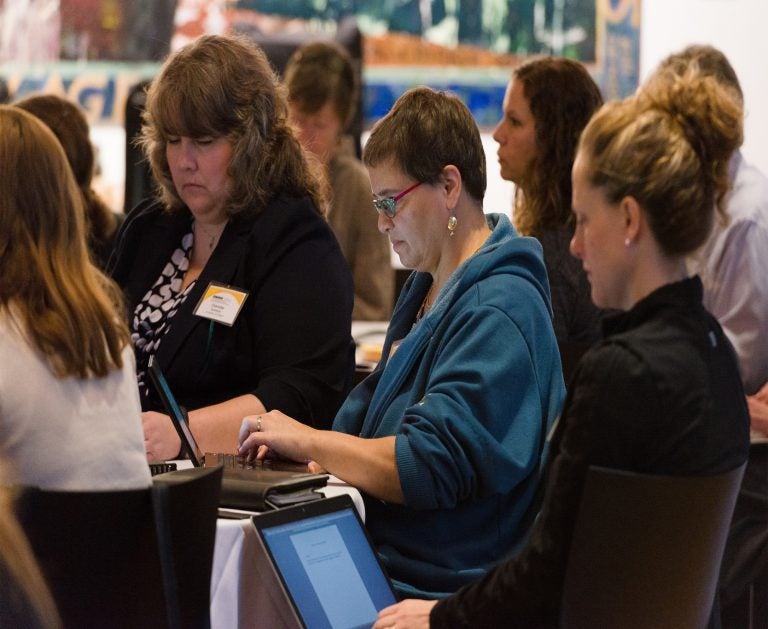
Determining the right photo to accompany other content is crucial. If the photo doesn’t stand on its own and tell its own, clearly related story, then it doesn’t matter how “good” it is. Let’s consider an example:
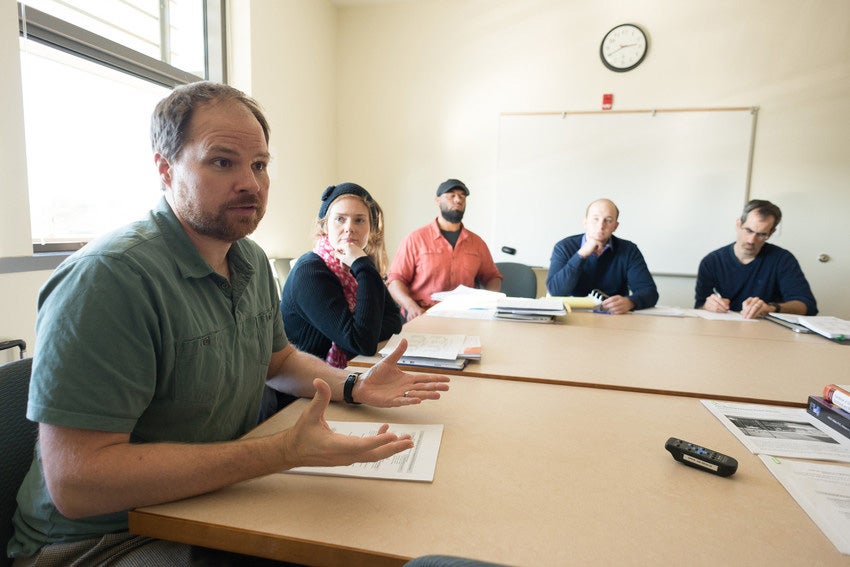
Who are these people and what are they doing? They appear to be having a conversation around a table. Okay, but where? And what are they talking about? Is it a board room of some kind at a business? Is it a class? Or maybe the person off-camera is in a team interview. You don’t know, because there is no context. It’s a plain, beige room with a blank white board and a clock on the wall, and there is no way to know what’s happening or why. That’s problematic.
What’s actually happening here is that doctoral students in special education are meeting with two professors from the program, one in the foreground and one professor emeritus off-camera. They could be changing everything we know about this subject, but for all anyone can tell, they could be anyone talking about anything. Even if you captioned and alt-tagged this photo, it doesn’t visually support any story you want to tell about special education research.
True, much of what people in this field do involves this sort of encounter or meeting. That’s just reality. But there are some things that could have been done to help add context to this particular photo, such as:
- Write some relevant stuff on the white board, large enough to read in the photo
- Ask the professor(s) to stand and point to items on the board so it at least appears that they are teaching something
- If the books on the table have to do with the subject, move them further into the frame so we can see what they’re about
- Shoot in a more contextual space, like a table outside the suite labeled “Special Education and Clinical Sciences,” or do a more artful shot of a two-person conversation through a door or window with those words etched on it
- Add a second photo that provides the context for the first, like the professor holding up a copy of the book he published, or posed next to a sign
Sometimes you’ll have what you have, and there won’t be much you can do about it, but it pays to be strategic with your shots. Add context wherever you can.
Sometimes, even good photographers fall into the trap of taking beautiful, tight shots of individuals and expressions but no wide shots of what’s going on. If your lens doesn’t really accommodate wide shots, move far away or snap a shot with your phone.
Using photos in publications and projects: The basics
Say you’re at the point where you need to find and use a photo, like on a presentation slide. For the sake of expedience, let’s also say it’s a photo you “own” or otherwise have the rights to use. You’ve picked it out and you know where it is on your computer. Now what?
The first step should be to determine whether the image needs cropping or editing. Assuming it’s relatively large to start with (probably > 1MB), you have that flexibility. If your photo is of people, from a distance, it’s usually best to push in as much as possible on your crop so you can clearly see their faces. Sometimes the context is more important, like people at a ribbon cutting, in which case you need a wider angle. But closer is usually better.
Now you have a cropped image (or not). How does it look? Is it dark or bright? Oversaturated or washed out? Most digital cameras do a good job preventing problems significant enough to require correction for most purposes. If it obviously requires some tweaks and you don’t know how to do that, ask around. Someone who knows Photoshop well can work wonders with exposure, color, etc. in a fairly short timeframe.
Once it looks as good as it can, consider the size, either by looking at the pixel dimensions or by the file size. For most electronic purposes (except some website uses), something in the 100-500k neighborhood is plenty. If your photo is 8 MB, you face a choice: Leave it or shrink it. If it’s for print, leave it — you want all the resolution you can comfortably manage. If it’s for a presentation, it just depends on the nature of the presentation. If you’re running it from your own computer’s hard drive, the extra resolution is fine (needless, but fine). If you’re running it online (like Prezi or through a website), you’ll want to make that file smaller.
Making an embedded image smaller in a document doesn’t make the image’s file smaller.
If you’re using the image on a website, then you definitely want it smaller, no more than a few hundred kilobytes in most cases. Not only are load times faster that way, but for your stakeholders viewing it on a mobile device, it reduces their data usage. That said, high-resolution displays like Apple’s Retina displays are capable of displaying 2x the resolution of older/cheaper displays. To accommodate those screens, double the width of your photo.
Shrinking the file sizes of digital photos
Again, Photoshop offers many ways to reduce the size of a photo, either through making it physically smaller or through a different compression algorithm. If that’s not an option, we like Bulk Resize Photos, a free, web-based app with no frills and blazing fast execution (works in Chrome or Firefox). But there are literally dozens that will do this. Google’s Picasa or Apple’s iPhoto can also handle resizing.
One roundabout, but still effective way is to make sure you have WiFi and e-mail it to yourself, then save the photo to your photo app. Then send yourself an e-mail from your phone and insert the photo. iOS asks you to specify small, medium, large, or original, which quickly and easily resizes the photo prior to sending.
Finding photos to use
Often you don’t have internal photography, and sometimes you do. Regardless, you’ll occasionally need to find what you need and know a little about what you should or shouldn’t use.
There are three main kinds of photos at your disposal:
- Photos you purchase the rights to use
- Photos you download for free, irrespective of the usage rights
- Photos you download for free that are legal for your particular use
Purchased photos
These are your stock photos, like iStockphoto (Getty Images) and Shutterstock. Typically you pay for single downloads, a small block of downloads, or via a subscription. Once you pay the fee, you can do whatever you want with the photo. The downsides are a) you’re limited to what’s available, and b) stock photos usually look like stock photos.
Free, usage rights unclear
Google Images is pretty agnostic when it comes to usage rights, but it doesn’t crawl everything either. If you click “Search Tools” under the search bar on a results page, there’s a drop-down menu called “Usage Rights” that gives you options to filter by the rights type granted. Not all images, however, have this kind of metadata attached.
We are not lawyers or legal scholars; all we have is personal experience and interactions with people familiar with the laws around this. Bearing that in mind, here’s our take: If usage rights are unclear and you happen to use a photo for which you don’t have explicit usage rights, you probably are okay. Even in the unlikely event that you are shown to have used a photo illegally, our understanding is that prosecutors usually ask an, “Are they evil?” question, in order to justify the time and effort of pursuing a copyright complaint. You most certainly are not, therefore the most likely worst-case scenario is that you get a cease-and-desist. But even that is unlikely because of Fair Use.
A good rule of thumb is to let your sensitivity level about usage rights rise to match the visibility of the project. Putting something on a billboard is very different from putting it on your blog.
All that said, if you know the photographer, credit them.
Free, usage rights ascertained
Except where covered by Fair Use, the rights that will likely be attached to a photo online are Creative Commons rights. There are many different CC “licenses,” where are more like terms of use to which you agree by virtue of downloading the resource. Most licenses focus on whether attribution is required, or whether it is cleared for commercial use. CC Search crawls the major assets under CC’s purview using Google’s engine and pre-setting the usage filter.
As mentioned elsewhere in this toolkit, Pexels and Gratisography are reasonably good sources of free-and-clear photos.
As with all graphics and artwork, hold down SHIFT when resizing to maintain the correct aspect.
Working with photographers
![]()
Good photographers are expensive, but can be worth it. Though they are artists, the amount of artfulness they choose to inject in their work may be up to you.
It’s not unusual for good photographers to charge at least $100/hr for their services, so if you’re bringing in a pro, there’s real value in preparation.
Events
Often you’ll need event photography, but really consider whether it’s a need or a want. Photos of an event taken “for posterity” are often generic and/or indistinguishable from similar (or the same) events from one year to the next, so maybe you do it every other hear, or ask your hobbyist friend if he’d do it for a case of beer. Just about anyone with a phone can take a “man at podium” picture or a group photo decent enough for social media or a newsletter. If the shots you need are very straightforward, you may not need a pro. But if it’s a particularly large/important event and you can’t risk anything going wrong, hire someone who knows their stuff.
But if you need a pro for your event, project yourself into a time after it’s over. What pictures do you NEED to have (group photo of the board, keynote speaker, wide shot of the audience, etc.) Write them down. Very clearly communicate the must-have shots to your photographer, then give them some artistic parameters. If you need ordinary, down-the-middle stuff for your ultraconservative constituency, say that. If you need something arty for an annual report or donor booklet, give them some direction, like “soft” or “uniquely framed.”
Other photography/art direction
Outside of events, there are any number of reasons you need a pro lenser. Staff photos. Donor or board portraits. A guest speaker. Action photos of people doing work, in their element. Whatever it is, your input has a great bearing on the output.
Really good photographers will do impressive work with very little guidance, but they can do stupendous work with just a little of it. Whether you know it or not, you probably have some idea in your head what the resulting pictures look like. Tell them about it, even if it sounds hokey. “You know that thing where the main person is standing still but there are blurry people moving all around them? I want something like that.”
Believe us, they’ll appreciate the forethought and the parameters. But if you don’t communicate thoroughly and are sifting through hundreds of photos after the fact, you can’t really complain about the results.